AWS DMS (FREE TIER)
How to Migrate MS SQL Database from On-Premise / EC2 Instance to RDS using Data Migration Service (Free Tier)

At the end of this article, you will learn how the DMS exactly works using your AWS Free Tier Account.
In this article, I will show you, how to migrate MS SQL Database from On-Premise / EC2 Instance to AWS RDS using Database Migration Service.
Prerequisites:
- AWS Free Tier Account.
- Little Knowledge on AWS Cloud.
Let’s dive deep into the migration.
RDS Database Creation:
Login to your AWS Console, Click “RDS” under “Services”.

Select “RDS” under Services
As a first step, I have created AWS RDS MS – SQL Instance of db.t2.micro with 1v CPU, 1GB RAM, and 20GB of Storage.

Click “Create Database” in RDS ConsoleSelect the box to enable Free TierSelect the “MS SQL Server Enterprise Edition”

Select the box to enable Free Tier

Select the “MS SQL Server Enterprise Edition”

In the settings, I have provided the DB instance identifier, Master Username, and Master Password, then click “Next”.

On the next page, I have selected the default VPC and DBSubnet groups and making it publicly accessible (In a business scenario, the RDS will be private and accessed only fromEC2 instance for security). You can use the default Security group, or you can create your own security group with port 1433 open to access the MS – SQL Database from SQL Server Client.
I have left other things as default and creating the database. It will take from 5 to 10minutes for the database to come live.

Here I have enabled termination protection; you can remove it if you don’t need to run the database after this migration.

Database is available
Once the database is available, get the endpoint of the database and try logging into the database using SQL Client. The end-point will look like this: jamalmohamedh.boeyjkjygsu3.us-east-1.rds.amazonaws.com. You will also able to see the different Cloud Watch Monitor such as CPU Utilization, DB Connection, etc., for your database


Database Endpoint
After logging in, create a new database in which you want to migrate the existing database. Here I have created a database name “Alteryx”.


Alteryx Database
On-Premises Database Creation:
If you have an existing On-premises / EC2 Instance MS – SQL Database, you can skip this portion. If you want to create a new database, you can install MS – SQL Enterprise on EC2 free tier t2.micro instance or on your Local PC.
The steps are as follows:
Launching the VM. Go to AWS. Open the EC2 Dashboard and Launch instance.


1.1. Click, “Launch Instance”

1.2. Select the Microsoft Windows Server 2016 Base

1.3. Select t2.micro General Purpose Instance

1.4. Leave other configurations as Default.


1.5. Name the Instance as DB Migration Test
1.6. Create a New Security Group which allows port 1433

1.7. Launch the Instance
Optional: Create a new key pair and download it.
Configuring the VM
Download the “Microsoft Remote Desktop” app
Configure the new configuration
2.1. PC name: Use the Public DNS of the VM
2.2. User: Administrator
2.3. Password: Can be received by right-clicking on the VM and “Get Windows Password”. Now Connect to the instance.
Download the “SQL Server Express” via PowerShell:
3.1. wget https://download.microsoft.com/download/9/A/E/9AE09369-C53D-4FB7-985B-5CF0D547AE9F/SQLServer2016-SSEI-Expr.exe -OutFile SQLServer2017-SSEI-Expr.exe
Download the “SQL Server Management Studio”
4.1. wget http://go.microsoft.com/fwlink/?LinkID=824938 -OutFile SSMS.exe
Install SQL Server Express with the “Basic” option
Install the SQL Server Management Studio.
Open port to the public
5.1. Start the “SQL Server Configuration Manager”
5.2. Click “SQL Server Network Configuration”
5.3. Open “Protocols for SQLEXPRESS”
5.4. Right-click “TCP/IP” –> Click” Properties”
5.5. Under “Protocol”: Set Enabled to Yes
5.6. Under “IP Addresses”: Set all “TCP Port” values to 1433
5.7. Restart the SQL Server instance
5.8. Go to the windows firewall
5.9. Click Advanced Settings
5.10. Add a new inbound rule which allows 1433 TCP connections

5.8. Search for “Windows Defender Firewall with Advanced Security”

5.10.1. Create New Inbound Rule with Port 1433

5.10.2. Select “Port” and click “Next”

5.10.3. Add “Port” and value as “1433”

5.10.4. Select all Checkboxes.

5.10.5. Name as “sqlin”

5.10.6. In the similar way, Create Outbound Rule and Name it as “sqlout”
Enable “Mixed Authentication mode”
6.1. Open the “Microsoft SQL Server Management Studio”
6.2. Right-click the SQL Server instance –> Click “Properties”
6.3. Open the “Security” menu
6.4. Change the Server authentication value to “SQL Server and Windows Authentication mode”
6.5. Save and restart the SQL Server instance.

6.3.1. Right-click on the Security and Create New Login

6.4. Enable SQ: Server Mixed Authentication and uncheck “Enforce Password Policy”
Create Login
7.1. In the “Microsoft SQL Server Management Studio” right-click on “Security” –> “New” –> “Login” item
7.2. Login name: your-preferred-name
7.3. SQL Server authentication –> Set password
7.4. Disable “Enforce password policy”
Give permission as a “sysadmin” to the new user
8.1. Open the “Microsoft SQL Server Management Studio”
8.2. In the, find the new user under Security -> Logins.
8.3. Right-click on the user and click properties.
8.4. Open the “Server roles” menu and select what are the roles you would like to add to the public user which we have created in order to list, read and write on the table.

- Give Permission to the New User to access the table.
For EC2 Instance, you can find the public ID from the AWS Console.
For On-premises, you can find the public IP from the browser using “whatsmyip”. If you are unable to access it, then you need to add your public IP in the Security Group of your Router.
Database:
You can use any application for creating a table in the database, here I have used Alteryx – Data analytics software for generating the database in tables. If you need any help in creating Alteryx database, you can post me, I’ll help you with the database table creation.
Migration using DMS and SCT:
Let us we proceed to migration using Database Migration Service and Schema Conversion Tool.
Under Services, Click “Database Migration Service”

Select Database Migration Service

DMS Dashboard

DMS Welcome Page
Click Next to proceed
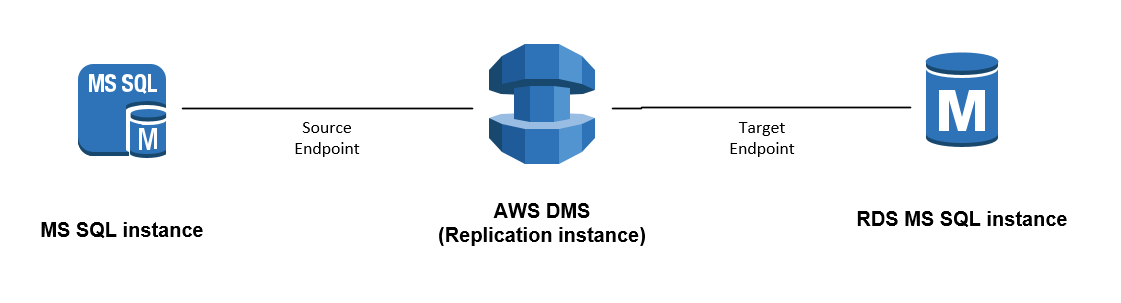
Now I have created a new migration instance and a new migration task. I have used “dms.t2.micro” for the database migration instance which comes under the free tier.

Select dms.t2.micro under Instance Class
Leave other things as default and click next. In the Database Endpoint, I have defined the source and destination endpoints and testing the connection. If the test is successful, proceed to define the task.

1.Database Endpoint Definition

2.Database Endpoint Definition

3.Database Endpoint Definition
Define the Migration Task with Name, Source, and Target database. Select the database schema format as dbo. This is the section where we will be defining the transformation of the schema. Therefore AWS DMS is called the Anything to Anything Migration tool by most of the users. The transformation rule defines the source database scheme and the target database scheme.

Define Task name

Task Settings

Selection and Transformation Rule
Here, I have given the selection rule only and not defining the transformation rule, as both the source and target database are MS – SQL.

Click Create Task after the Task Definition

Once the Task is created, Click Start to proceed with Migration.
Once the Migration is Complete, you will find the success message as Load Complete.

Database Migrated Successfully

Source Database Tables

Target RDS Database Table